Add custom error message on login screen on Documentum
What is Documentum
- Documentum is an enterprise content management platform, now owned by OpenText, as well as the name of the software company that originally developed the technology. EMC acquired Documentum for $1.7 billion in December, 2003.
- The Documentum platform was part of EMC's Enterprise Content Division (ECD) business unit, one of EMC's four operating divisions.
How this blog will help
This is a guide by which you would be able to use Documentum's web application which does not work on Window 10 machines and/or Internet Explorer 11 browser.So let's go. Scroll down.
Introduction
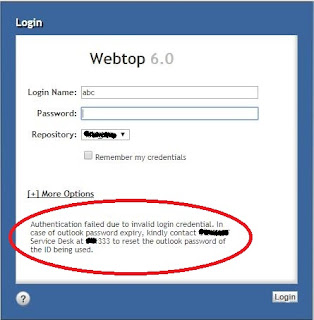
Here I would guide you on how can you use custom error message on login screen when the user enters wrong credentials to login into Documentum's web application.
Example:
Below diagram shows basic application hierarchy in Documentum's Webtop 6.0
A default custom directory is included in the product WAR file in the following location: virtual_dir/custom
This directory contains the sub-directories and files shown in the following figure.
Simple modifications can be made without extending an action or component definition. With a modification file, you can insert, replace, or delete an element from a specific configuration file.
Figure 2. Fragment of /webtop/config/login_component.xml as shipped
<component id="login" extends="login:wdk/config/login_component.xml">
<nlsbundle>com.documentum.webtop.session.LoginNlsProp</nlsbundle>
<centered>true</centered>
</component>
That tells us that the actual configuration information is extended from the lower‑level definition in the wdk directory. That’s where you will find the information you actually want to modify.
Figure 3. Fragment of /wdk/config/login_component.xml as shipped
<pages>
<filter clientenv="not appintg">
<start>/wdk/system/login/login.jsp</start>
</filter>
<filter clientenv="appintg">
<start>/wdk/system/login/appintglogin.jsp</start>
</filter>
</pages>
<class>com.documentum.web.formext.session.Login</class>
<nlsbundle>com.documentum.web.formext.session.LoginNlsProp</nlsbundle>
The above line of code shows that it loads login.jsp page from wdk/system/login/login.jsp location and it referes LoginNlsProp file from wdk\strings\com\documentum\web\formext\session location for different strings present on jsp.
2. Download the files from below location.
3. LoginNlsProp.properties file - wdk/strings/com/documentum/web/formext/session
4. login.jsp file - wdk/system/login
5. login_component.xml file - webtop/config/login_component.xml
6. Edit MSG_LOGIN_ERROR attribute as below in LoginNlsProp file.
MSG_LOGIN_ERROR=Authentication failed due to invalid login credential. In case of
outlook password expiry, kindly contact Service Desk at 333 to reset the
outlook password of the ID being used.
7. Add ‘width: 300px’ in the below line of code in login.jsp file of custom folder.
Code Before Change:
<div class='loginerrorspacing'>
<dmf:label name='<%=Login.CONTROL_ERRMSG%>' style='{COLOR: #FF0000}'/>
</div>
Code After Change:
<div class='loginerrorspacing'>
<dmf:label name='<%=Login.CONTROL_ERRMSG%>' style='{COLOR: #FF0000;width: 300px}'/>
</div>
8. Add below line of code above <nlsbundle>……</nlsbundle> line in login_component.xml file of custom folder.
<pages>
<filter clientenv="not appintg">
<start>/custom/config/login/login.jsp</start>
</filter>
<filter clientenv="appintg">
<start>/wdk/system/login/appintglogin.jsp</start>
</filter>
</pages>
9. Create ‘com/documentum/web/formext/session’ folder structure in custom/strings folder.
10. Copy LoginNlsProp.properties file from local copied location to destination location.
Destination location: custom/strings/com/documentum/web/formext/session
11. Create login folder in custom\config.
12. Copy login.jsp from from local copied location to destination location.
Destination location: custom/config/login
13. Copy login_component.xml file from local copied location to destination location.
Destination location: custom/config
Custom layer
WDK‑based applications make use of a customization layer, which allows you to keep configurations and customization in a location separate from the installed product. This allows the custom layer to be easily migrated after an upgrade or redeployment.A default custom directory is included in the product WAR file in the following location: virtual_dir/custom
This directory contains the sub-directories and files shown in the following figure.
Custom Layer inheritance and overrides
When you extend a definition in a configuration file in a WDK‑based application, any element that is defined in the custom definition will override that same element in the definition that has been extended. If the element is not specified in the custom definition, that element will be inherited from the component that has been extended in the XML resource file.Simple modifications can be made without extending an action or component definition. With a modification file, you can insert, replace, or delete an element from a specific configuration file.
Finding the right files
The first step in any configuration or customization is to locate the files you want to modify. This takes a bit of detective work with Webtop. The “obvious” place to start is the configuration file /webtop/config/login_component.xml. When you look in that file, though, you find that the primary element is defined as shown below.Figure 2. Fragment of /webtop/config/login_component.xml as shipped
<component id="login" extends="login:wdk/config/login_component.xml">
<nlsbundle>com.documentum.webtop.session.LoginNlsProp</nlsbundle>
<centered>true</centered>
</component>
That tells us that the actual configuration information is extended from the lower‑level definition in the wdk directory. That’s where you will find the information you actually want to modify.
Figure 3. Fragment of /wdk/config/login_component.xml as shipped
<pages>
<filter clientenv="not appintg">
<start>/wdk/system/login/login.jsp</start>
</filter>
<filter clientenv="appintg">
<start>/wdk/system/login/appintglogin.jsp</start>
</filter>
</pages>
<class>com.documentum.web.formext.session.Login</class>
<nlsbundle>com.documentum.web.formext.session.LoginNlsProp</nlsbundle>
The above line of code shows that it loads login.jsp page from wdk/system/login/login.jsp location and it referes LoginNlsProp file from wdk\strings\com\documentum\web\formext\session location for different strings present on jsp.
Adding the error message
1. Stop the respective application server i.e. either Websphere App server or Tomcat whichever is present in your environment.2. Download the files from below location.
3. LoginNlsProp.properties file - wdk/strings/com/documentum/web/formext/session
4. login.jsp file - wdk/system/login
5. login_component.xml file - webtop/config/login_component.xml
6. Edit MSG_LOGIN_ERROR attribute as below in LoginNlsProp file.
MSG_LOGIN_ERROR=Authentication failed due to invalid login credential. In case of
outlook password expiry, kindly contact Service Desk at 333 to reset the
outlook password of the ID being used.
7. Add ‘width: 300px’ in the below line of code in login.jsp file of custom folder.
Code Before Change:
<div class='loginerrorspacing'>
<dmf:label name='<%=Login.CONTROL_ERRMSG%>' style='{COLOR: #FF0000}'/>
</div>
Code After Change:
<div class='loginerrorspacing'>
<dmf:label name='<%=Login.CONTROL_ERRMSG%>' style='{COLOR: #FF0000;width: 300px}'/>
</div>
8. Add below line of code above <nlsbundle>……</nlsbundle> line in login_component.xml file of custom folder.
<pages>
<filter clientenv="not appintg">
<start>/custom/config/login/login.jsp</start>
</filter>
<filter clientenv="appintg">
<start>/wdk/system/login/appintglogin.jsp</start>
</filter>
</pages>
9. Create ‘com/documentum/web/formext/session’ folder structure in custom/strings folder.
10. Copy LoginNlsProp.properties file from local copied location to destination location.
Destination location: custom/strings/com/documentum/web/formext/session
11. Create login folder in custom\config.
12. Copy login.jsp from from local copied location to destination location.
Destination location: custom/config/login
13. Copy login_component.xml file from local copied location to destination location.
Destination location: custom/config
Additional Information
If you need additional information about the blog, please comment in the comment section below.
Do like, share and subscribe the blog.
Happy Documenting!!! Cheers !!!
Do like, share and subscribe the blog.
Happy Documenting!!! Cheers !!!


Comments
Post a Comment